Saturday, July 30, 2016

Guest Designer Spotlight: Baby Bear Card with Stephanie Klauck

Hello everyone, it's Stephanie here and I'm thrilled to be back on the Sunny Studio Stamps blog with a baby card that I created with the new Baby Bear stamp set. As soon as I saw this stamp set I knew that I would be making a ton of baby themed card with it. There are so many great images and sentiments that work so great together.

Sunny Studio Stamps: Sweet Bundle Baby Card by Stephanie Klauck (using Baby Bear & Summer Picnic)

To create my card I first created a background scene with Bristol cardstock and 3 shades of Distress ink (Peacock Feathers, Mowed Lawn and Twisted Citron). I die-cut all of the pieces and then I added the colour with an ink blending tool. Once I had them all inked up, I spritzed some water onto all of the pieces and then dabbed it up with a paper towel to create some texture.

I stamped and coloured all of the images that I wanted to use in the scene and then I cut them out with my scissors. I also stamped, coloured and cut out the tree from the Summer Picnic stamp set to use in the scene.

Sunny Studio Stamps: Sweet Bundle Baby Card by Stephanie Klauck (using Baby Bear & Summer Picnic)

I added some twine from behind the tree and adhered the baby bear wrapped in the blanket onto it and then I padded the rest of the bears in the grass. I stamped the sentiment directly on the card front and then I added some clear sequins to complete the card.

Thanks so much for joining me on the blog today! 


Supplies:
Baby Bear Stamp Set
Summer Picnic Stamp Set
Bristol Cardstock
Distress Inks
Tuxedo Memento Black Ink
Copic Markers
Twine

Friday, July 29, 2016

Baby Bear Watercolored Panels Card with Lexa

Happy Friday everyone! Lexa here with another sweet baby card using Baby Bear stamps and coordinating dies. I create watercolored square panels and lots of cute baby stuff for my card. I just can't resist all the adorably tiny little things on this set!

Sunny Studio Stamps: Baby Bear Watercolored Grid-Style Card by Lexa Levana.

I start my card by creating watercolor backgrounds in blue, yellow and green on a piece of watercolor paper. I then cut 6 panels with a basic stitched square die. I love the color combination! Then I stamped all my images in Versafine Onyx Black and watercolored them with Distress Markers. I also create some details with a white gel pen--it always adds extra something. The onesie, milk bottle, diaper pin, a pair of tiny socks, and a blue polka-dot sleepsuit...aren't they the cutest?

Coordinating dies surely make everything easier, but sometime I need to fussy cut them as I did on the blue bib. So it looks like a built-in stamp, I was inspired by Mendi's cards, she does it a lot. Finally I tied brown twine on the top, it matches my baby bear perfectly.

Sunny Studio Stamps: Baby Bear Watercolored Grid-Style Card by Lexa Levana.

I hope you like today's card. Have a great weekend!

Thursday, July 28, 2016

Baby Bear Sweet Bundle Card with Vanessa

Hey everybody!  Vanessa here with a card using the sweetest Baby stamp set "Baby Bear" and its coordinating dies

This set offers so many possibilities, I had problems deciding what to create first! Here comes my project for today:

Sunny Studio Stamps: Baby Bear Sweet Bundle Card by Vanessa Menhorn.

I first trimmed a piece of patterned paper slightly smaller than my Kraft card base, wrapped green twine around it and adhered it to the card with foam tape. Now I stamped the cute images, colored them with watercolors, die-cut them with the matching dies and adhered them with foam tape. I stamped and heat-embossed the sentiment onto a strip of green cardstock, trimmed it and adhered it to the card. Finally I added red enamel dots. 

Sunny Studio Stamps: Baby Bear Sweet Bundle Card by Vanessa Menhorn.

Don't you love the adorable little images? I think this set is perfect. I hope you liked my card today! Have a wonderful rest of your week and thanks for visiting!

Vanessa

Wednesday, July 27, 2016

Baby Bear Rubber Ducky Baby Card with Lindsey

Hi, Lindsey here today sharing another card using the adorable Baby Bear stamp set and coordinating dies. This has to be my favorite set from the new release. I love making baby cards and this set is perfect for any kind of baby card you may need. Let's get started!

Sunny Studio: Baby Bear Welcome Little One Card by Lindsey Sams.

I started off with an A2 size card base with some cute little duckies on it. Next, I cut a more narrow piece of yellow patterned paper to hold my images and sentiment. I cut the letters to spell the word "baby" but instead of using two b's, I let the little sitting bear be a "stand in" for one of them. I also used a little ducky from the older Rain or Shine stamp set. He just looked too cute sitting on to of the letter "A." I stamped the sentiment from Baby Bear under my larger letters and bear. To finish this card I cut two strips of teal paper and scalloped their edges to tuck under the yellow patterned paper. This card would be great for a boy or a girl because the color scheme works for both. 

Sunny Studio: Baby Bear Welcome Little One Card by Lindsey Sams.

That's it for me today. I can't wait to see what you guys come up with using this adorable set. Remember to check back to the blog for more inspiration using all the new release. Thanks for reading and have a great day!

Tuesday, July 26, 2016

Baby Bear: Welcome Baby Onesie Card by Anni

Hey stampers, Anni here!

Awe, isn't this new baby set called Baby Bear the cutest? I couldn't resist the sweet onesies and made a card with them.

Sunny Studio Stamps: Baby Bear Welcome Baby Onesie Card by Anni Lerche.

I started by stamping the images on Strathmore Bristol Smooth paper using Memento Tuxedo Black ink. I also used the cute little images to decorate my onesies. For coloring the images I chose colored pencils.

Sunny Studio Stamps: Baby Bear Welcome Baby Onesie Card by Anni Lerche.

For the sentiment I stamped the "welcome" in Versafine and embossed the word "baby" with a aqua embossing powder.

I adhered a piece of matching patterned paper to the card base and assembled the card.
For the last finishing touch I added faux stitching to the edge of the card panel.

Thanks for stopping by and have a sunny week!
Anni

Monday, July 25, 2016

Baby Bear Welcome Little One Card with Eloise

Hi everyone, Eloise here and today I have a fun new baby card featuring the new Baby Bear stamp set along with a couple of previously released products. I love the idea of a washing line with all these baby clothes, so I thought it would be a fun idea to create a card with it.

Sunny Studio Stamps: Baby Bear Welcome Little One Clothesline card by Eloise Blue.

To start off I stamped out all of my images from the Baby Bear stamp set on some white cardstock. Then for the clothes line, it's the wave line stamp from the Island Getaway stamp set and then for the sticks on the side of the clothes line I used a ruler and a Copic Multiliner to draw them since I needed something for the clothes line to hang off of. I then used various Copic Markers to colour them all in. I then die cut all the images out and used my Brother Scan N Cut for the poles and clothes line since I wanted it to be consistent. I also trimmed out the bib and bow by hand so it would look better on my bear.

I then moved onto the ink blended background pieces. I used a couple dye inks to blend the blue sky background piece and then a green to blend onto the bottom grass piece. I then took the die from the Sunny Sentiments Coordinating Die set and cut out the grassy border from that piece. I also used the cloud die in that set to cut out some white clouds. I then moved onto stamping my sentiment onto my grass piece, which is also from the Baby Bear set with some Versafine Onyx Black ink since I wanted it super dark. I made sure I adhered it towards the bottom since I knew where everything was going to be placed.


Sunny Studio Stamps: Baby Bear Welcome Little One Clothesline card by Eloise Blue.

Now it was time to arrange my card. I adhered down my grass piece on top of my sky piece and then adhered down the clouds flat onto the background. I then put tiny pieces of foam adhesive behind the clothes line and stuck that down to the centre of the panel first. I then used more foam adhesive to adhere down the poles to each side. I also used foam adhesive for the clothes on the line too and then adhered down the pegs using some liquid adhesive. I also used liquid adhesive to adhere down the bib and bow to the baby bear and then adhered her down to the card using foam adhesive. I then popped up my whole panel onto some fun foam and then down onto a light purple card base and that finished up the card.

I hope you enjoyed my card today and got inspired. I absolutely love this new baby set, it's so super cute. Make sure you hang around the blog this week as there's going to be a lot more amazing projects from the Design Team using this amazing stamp set.

- Eloise

Sunny Studio Products Used:

Saturday, July 23, 2016

Sunny Saturday Share: Fun & Happy Customer Cards for Summer


Hello everyone!  How have you been?  I hope you are all enjoying your summer!  I thought I would pop in and share a handful of fabulous customer cards that caught my eye over the past couple of weeks...  

Sweet Shoppe Ice Cream Card by Juliana Michaels (@julianamichaels on instagram)


Sweet Shoppe Rainbow Sorbet Ice Cream Cone Card by Juliana Michaels

Stars & Stripes Rainbow Card by Creations Galore (@creationsgaloregb on instagram)


Sunny Studio Stamps: Stars & Stripes Rainbow Card by Creations Galore.

Fresh & Fruity Tag by Raquel Stienecker (@raquelstienecker on instagram)


Sunny Studio Stamps: Fresh & Fruity Strawberry Gift Tag by Raquel Stienecker.

Tropical Paradise Tag Cards by Kumiko (@kumiko_hata on instagram)


Sunny Studio Stamps: Tropical Paradise Flamingo Tags by Kumiko

Tropical Paradise Planner Pages by Kim Gaughan (@ombrescissorscrafts on instagram)


Sunny Studio Stamps: Tropical Paradise Plumeria flowers & Pineapple Planner Pages by Kim Gaughan

Island Getaway & Tropical Paradise Card by Irene Martín (@irenemartincrafts on instagram)


Sunny Studio Stamps: Tropical Paradise & Island Getaway Card by Irene Martín

Tropical Paradise Card by Jessica Griswold (@jess71004 on instagram)

Sunny Studio Stamps: Tropical Paradise Flamingo & Hibiscus Flowers Card by Jessica Griswold

Thank you for sharing your talents & beautiful projects with us!

I can't wait to see what you all create with our newest stamps and dies!!!  Don't forget to tag us with the hashtag #sunnystudiostamps and share your beautiful projects with us on Instagramour facebook page or in our flickr group!  

Friday, July 22, 2016

City Streets Friendship Card with Lexa

Hi everyone! Lexa here with a pretty city scene using the City Streets stamp and coordinating dies. Honestly, I wasn't sure what should I do with this stamp set at first glance. I mean look how detailed and tiny all the elements are--I might get in some trouble coloring them. BUT...everything changed when I started to imagine how I would like the buildings to look. It reminds me my college time.  Did you know that I majored in architecture? So yeah, this set has some kind of special connection with me. I'm wondering if some of you will understand how I feel. :)

Sunny Studio Stamps: City Streets Downtown Shops Friendship Card by Lexa Levana.

I love spending time with my girls.  Time pasts really fast every time I'm with them. That's the inspiration for today's card...Hanging out until the sun sets with a pretty pink sky like the ones often seen from where I live. I blended Spun Sugar, Worn Lipstick, Squeezed Lemonade Distress Inks on smooth white cardstock as my background. I'm still learning the how-to blend them smoothly. I also flicked some water for the white spots.

All the images are stamped with Versafine Onyx Black and watercolored with Distress Markers. I use a super fine tip brush and had to be extra careful so the inks won't bleed. Instead of using black cardstock for the street, I choose black polka-dot patterned paper. I love anything in polka-dots. Hehe. For a last touch I used some Wink of Stella glitter and glossy accent on every window.

Sunny Studio Stamps: City Streets Downtown Shops Friendship Card by Lexa Levana.

I hope you like it.  Thank you for stopping by and have a great day!


Thursday, July 21, 2016

City Streets Masculine Car Card with Vanessa

Hi everyone!  Vanessa here with a masculine card using City Streets

I don't know about you, but I have problems creating cards suitable for men. Most of them don't like the cute, overloaded stuff. But just by using the right colors and keeping it clean & simple, I think this one would be ok for a guy.

Sunny Studio Stamps: City Streets Masculine Cruisin' By To Say Hi Card by Vanessa Menhorn.

I stamped the shops onto a panel of watercolor paper that I had trimmed slightly smaller than my grey card base and colored them with grey watercolor. Now I stamped and heat-embossed the sentiment from Sock Hop onto a strip of black cardstock and adhered both, the panel and the strip, to the card. Then I stamped and colored the car and die-cut it with the matching dies. It is so difficult to see it, but I added Glossy Accents to the car to make it shine. Finally, I adhered the image to the card with foam tape and finished the card off with matching sequins. 

Sunny Studio Stamps: City Streets Masculine Cruisin' By To Say Hi Card by Vanessa Menhorn.

I hope you like today's inspiration! The City Streets set is so fun, don't you think? Thank you for stopping by today!

Vanessa

Wednesday, July 20, 2016

City Streets Interactive Spinning Car Card with Lindsey

Hi! Lindsey here today with a fun interactive card using the cool new stamp set City Streets. I loved the little car and scooter in this set, so that took center stage on my card. I wanted the cars to be able to "drive", so let's take a closer look at how I accomplished that. 

Sunny Studio Stamps: City Streets Interactive Spinning Car Card by Lindsey Sams.

I started off with an A2 size stitched rectangle in light blue. Then, I stamped the different buildings from City Streets all over the rectangle in a blue dye ink. I set that aside and cut a large and small stitched circle, the large from grey cardstock and small from white. I stamped and colored five of the little cars in the set. After cutting the cars out with the coordinating die, I adhered them to the large grey circle which I considered the road. I stamped the greeting, scooter and dog on the small white circle. I bent the greeting to follow the line of the circle. 

Once all my pieces were ready, it was time to assemble the card. I pushed a brad through the center of the circle and then through the center of the blue rectangle. This will allow the grey circle with the cars to spin. I then adhered the white circle to the top of the brad. This way, the grey circle can spin, but the white circle stays stationary. I decided that the card needed a little something extra to bring it all together, so I put a red scalloped piece of cardstock behind the blue rectangle panel. That's it! 

Sunny Studio Stamps: City Streets Interactive Spinning Car Card by Lindsey Sams.

I just love how this card turned out. I hope you'll try your own interactive card and check out this fun stamp set. Don't forget to keep checking back to the blog for more inspiration using these fun new stamp sets. Have a great day!

Tuesday, July 19, 2016

City Streets: Let's Have some Coffee by Anni

Hey stampers, Anni here.
Today's card features the City Street Stamp set. What a great and versatile set!


I started the card by chosing a color scheme from my Copics: I decided to go with shades of lime green, turquoise and aqua. I stamped the café because I knew I wanted to go with the caffee theme. But I also stamped ALL the accessoires, some even twice, so I had a good variation to choose from.


Fo the background I did some inkbending but it became a little bit blotchy. But I arranged the images and realized that it wouldn't occur to someone who don't know.
I arranged the images the way I liked it and stamped the sentiment. For the cardbase I chose a macthing cardstock.

Thanks for stopping by and have a sunny week.

Monday, July 18, 2016

City Streets Fun Street Scene Card with Eloise

Hello everyone, Eloise back here again today to show my card for the new super fun City Streets stamp set and coordinating dies. I love this set so so much, there is such amazing detail on these images and I had so much fun colouring these all up!

Sunny Studio Stamps: City Streets Fun Street Scene Card by Eloise Blue.

To begin my card today I stamped down all my images from the City Streets stamp set on some watercolour paper using some black ink, I also then clear embossed over the images to give it a raised line so it would be easier to contain the watercolour when colouring, since these images are so super small and detailed. I used Peerless Watercolours along with a water brush to colour these images. I love my Peerless Watercolours! Once they were all coloured, I made sure they were all dried and then I used the coordinating dies to cut all these images out. There's even itty bitty dies to cut out the little dog and mail box, how super cute is that!

Once that was done I worked on my background. I used some painters tape to do the masking and also some post it tape to create the hills in the background - I just used my scissors to create that effect since it's super easy and I didn't think much of it would show anyway. I used four Distress Inks to create the different layers also.

Sunny Studio Stamps: City Streets Fun Street Scene Card by Eloise Blue.

Now that all my blending was done I adhered my scene together using flat and dimensional adhesive and popped up the entire panel on a sheet of fun foam and adhered it to a green card base. I decided against adding a sentiment to the front of the card for today, since I loved the scene so much I didn't feel like there was room to add a sentiment. So I'll just stamp the sentiment on the inside when I'm ready to send this card and choose the most fitting one. :)

I hope you enjoyed my card today! Make sure you check by the blog this week to see all the other ladies fabulous projects!

- Eloise

Sunny Studio Supplies Used:

Saturday, July 16, 2016

Guest Designer Spotlight: Cards with Debbie Olson

Hello there!  I'm so excited to welcome Debbie Olson to the blog today.  I have admired her mad coloring skills and great eye for design for years.  I was over the moon excited to meet her for the first time earlier this year and even more thrilled when she agreed to be our special guest!

Sunny Studio Stamps: Guest Designer Spotlight Cards by Debbie Olson.

Good morning!  Debbie Olson here, privileged to be a guest of Sunny Studio today! When Mendi shared her new release, I knew that I’d love playing with it; so today I have cards using the Sweet Shoppe and Sock Hop stamp sets to share.

Sunny Studio Stamps: Sweet Shoppe Birthday Card by Debbie Olson.

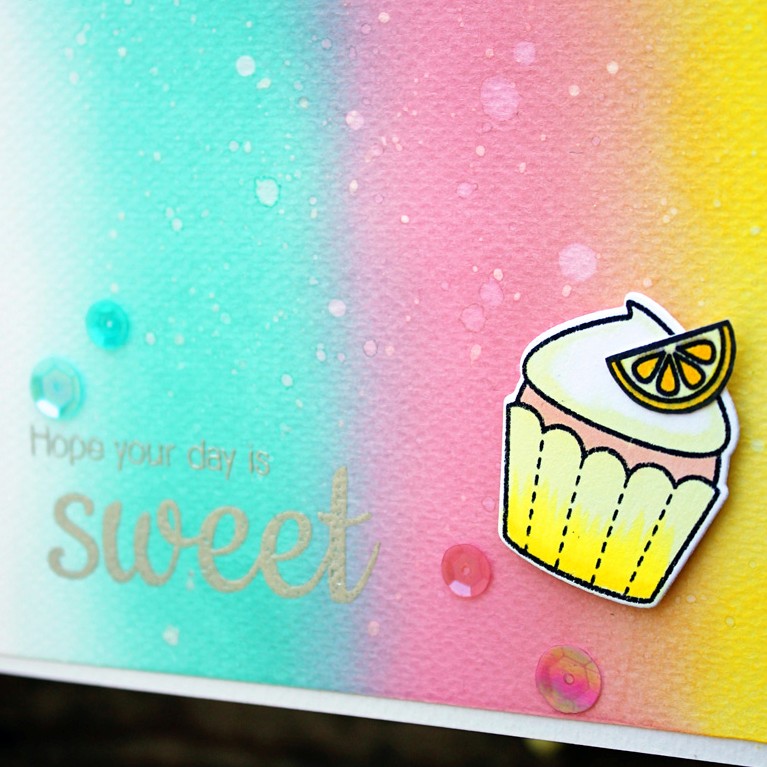
First up is Sweet Shoppe—so many fun images to color in this set! I couldn’t decide upon just one, so I chose to use three of them, with a clean and simple layout. I colored my images with Copic markers and die-cut them, airbrushed a splash of YR31 to warm up the white background behind the sweet treats, stamped my sentiment, and them used foam tape to pop up the images.

Sunny Studio Stamps: Sweet Shoppe Birthday Card by Debbie Olson.

I used the strawberry again on the inside of my card, along with a continuation of the sentiment.

Sunny Studio Stamps: Sweet Shoppe Birthday Card by Debbie Olson.

Shown above are the Copic markers that I used to color the Sweet Shoppe images.

Sunny Studio Stamps: Sock Hop Cool Cat Guitar Card by Debbie Olson.

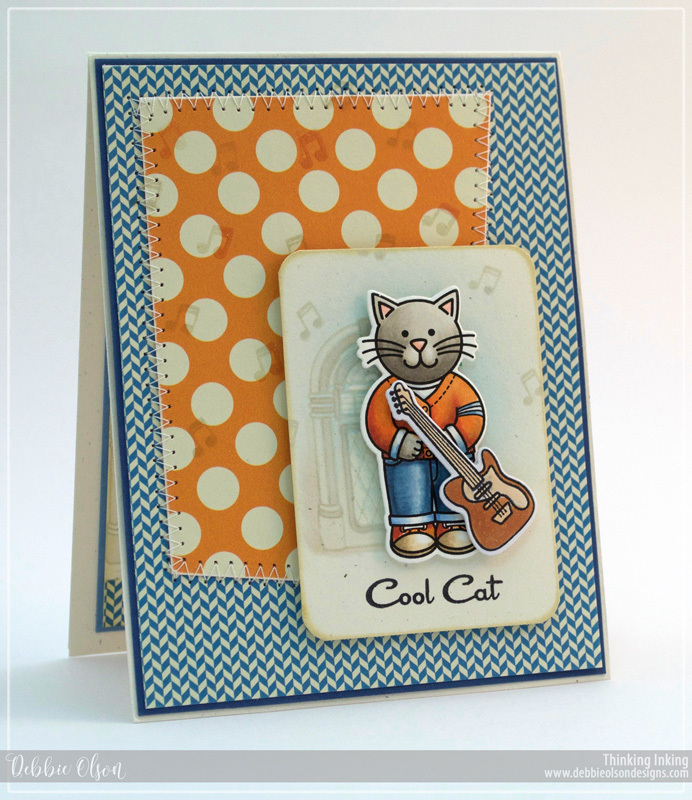
Next is the Sunny Studio Sock Hop stamp set; this set has a TON of possibilities! I chose Cool Cat for my first card, pairing him up with some Lily Bee Design Pinwheel papers.  I stamped the jukebox lightly as a backdrop for Cool Cat, and die-cut both Cool Cat and his guitar to pop up with foam tape in the foreground

Sunny Studio Stamps: Sock Hop Cool Cat Guitar Card by Debbie Olson.

Here are the Copics that I used to color Cool Cat.

Sunny Studio Stamps: Sock Hop Masculine Retro Car Card by Debbie Olson.

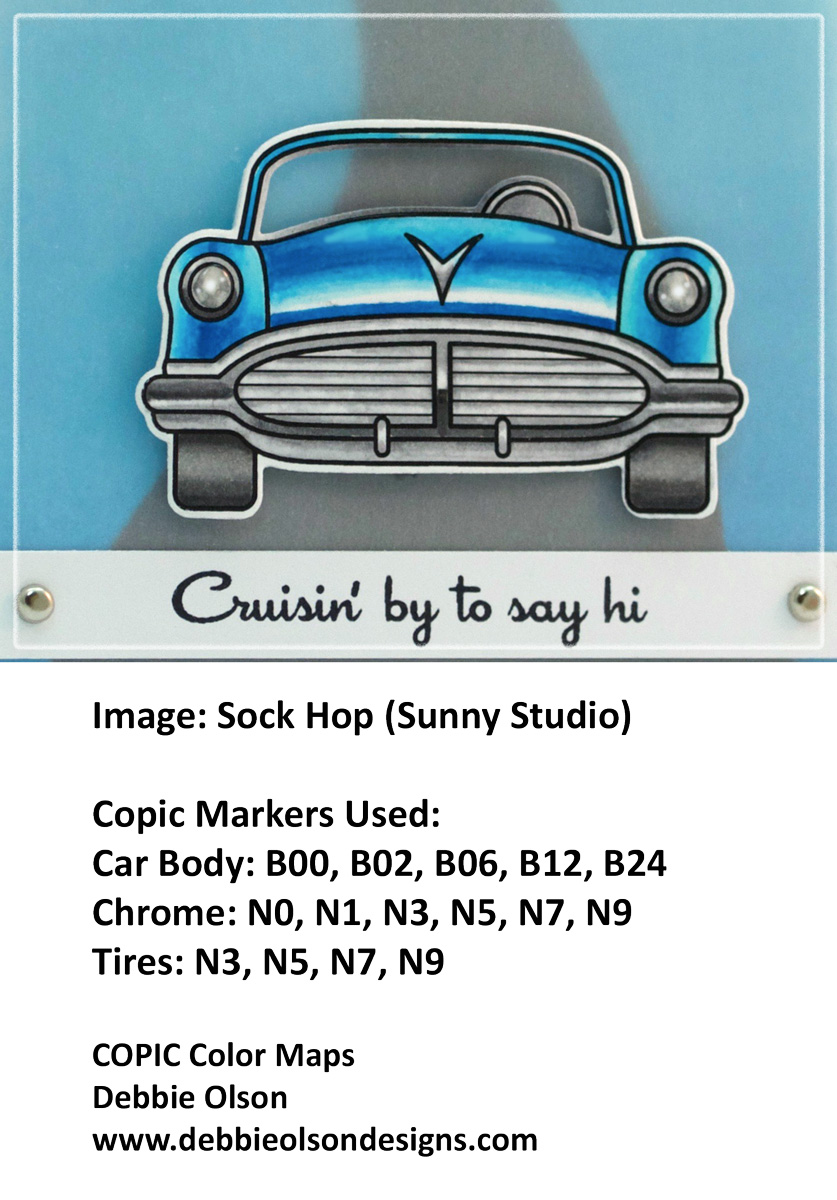
Finally, I created a “guy card” for someone who loves his Chevys. I had already colored my Sock Hop image before I looked for patterned paper, which turned out not to be such a good idea when I had not a single blue in my stash that went with the blues I had used on my classic car! After several “didn’t quite work” backgrounds, I finally airbrushed a background for my car, using many of the same colors that I had used to color the car. Because I didn’t want the background to compete with the car image, I used a piece of vellum on top of my airbrushed background, gluing it under the car, and also attaching it with the same brads that attached my sentiment panel. 

Sunny Studio Stamps: Sock Hop Masculine Retro Car Card by Debbie Olson.

Shown above are the markers that I used to color the classic car. (If you are looking for color and shading ideas on this car, google ’57 Chevy images—you’ll find an abundance of them!)

I hope that these ideas are helpful with your Sunny Studio Sweet Shoppe and Sock Hop stamp sets. A huge thanks to Mendi for inviting me to Sunny Studio today!


Sunny Studio Supplies Used:


Friday, July 15, 2016

Sweet Shoppe Birthday Wishes Card with Lexa

Hi everyone. Lexa here today with Sweet Shoppe (with coordinating dies) as the star of my card. I fall in love instantly with this set as I'm a sweet tooth myself, I craved for something sweet after I saw all the images. I bet some of you understand how I feel. Hehe.

Sunny Studio Stamps: Sweet Shoppe Sweet Birthday Wishes Donuts Card by Lexa Levana.

This card is a very simple one, I started with a 4.25" x 5.5" smooth white cardstock, blended with Squeezed Lemonade and Mustard Seed Distress Inks for the background. Because I needed a "ground" to place my donuts, I cut a strip of plaid patterned paper as the tablecloth. Two donuts have holes on them and the others don't. The trick is I wipe the hole before I stamp the image, easy peasy right? Then I stamped different toppings for each donuts.

For my card I choose the donuts with four different glazing flavors: chocolate, strawberry, mint and vanilla. My favorite will be the mint with crunchy chocolate on it. Yum! I stamped all the images with Versafine Onyx Black ink, watercolor them with Distress Markers after that. I also add some glossy accent to give a real glazing look. Here's a closer look..

Sunny Studio Stamps: Sweet Shoppe Sweet Birthday Wishes Donuts Card by Lexa Levana.

Thank you for looking, I hope you like today's card as much as I do. Have a wonderful day!

Thursday, July 14, 2016

Sweet Shoppe Rainbow Cupcake Card by Vanessa

Hello everybody! Vanessa here with a card using the Sweet Shoppe Stamps & coordinating dies. The images of this set are so yummy! For my first card, I chose to create a lemon cupcake:

Sunny Studio Stamps: Sweet Shoppe Rainbow Lemon Cupcake Card by Vanessa Menhorn

First, I trimmed a piece of watercolor paper slightly smaller than my card base and inked it using yellow, pink and aqua ink. Then I added little drops of water. After it was dried, I stamped and heat-embossed the sentiment using silver embossing powder and adhered the panel to the card. Now I stamped, colored and die-cut the cupcake and adhered it with foam tape. I topped it with a slice of lemon from the Tropical Paradise set. Finally, I added matching sequins.

Sunny Studio Stamps: Sweet Shoppe Rainbow Lemon Cupcake Card by Vanessa Menhorn

Can't wait to use this set again to "bake" something yummy :) I hope you liked today's inspiration! Thanks for visiting!

Wednesday, July 13, 2016

Sweet Shoppe Birthday Wishes Card with Lindsey

Hello, Lindsey here today sharing a birthday card using the fun and yummy set Sweet Shoppe stamps as well as the coordinating dies, new Fishtail Banners 2 and Sweet word die. I love all the sentiment combinations in this set and that it coordinates with the new Sweet word die. There are so many options! Let's get started on how I created this "sweet" birthday card.


Sunny Studio Stamps: Sweet Birthday Wishes Ice Cream Cone, Cupcake & Donut Card by Lindsey Sams.

I started with an A2 size card base of pink patterned paper. I then cut a green piece of cardstock with the scalloped Fishtail Banner 2. Then, I cut a piece of white cardstock and embellished it with the dot detail from the Fishtail Banner 2 die set. I wanted to use the Sweet word die so I made it part of my sentiment. I cut it from both pink and green cardstock and layered them together. I stamped the rest of the sentiment from the Sweet Shoppe set using some green dye ink. 

I also stamped the donut, ice cream cone, and cupcake from the set. I colored all my images with Copic markers and used the coordinating dies to cut them out. I adhered the sweets to the white part of my card, popping up the donut and cupcake with foam tape. Finally, I added a small strip of green cardstock to the bottom of the card to pull it all together. I added some Wink of Stella to all the sweets and some sequins for a little extra interest and shine. 


Sunny Studio Stamps: Sweet Birthday Wishes Ice Cream Cone, Cupcake & Donut Card by Lindsey Sams.

I love how this card turned out, and I can't wait to see what you come up with! Thanks so much for reading. Be sure to check back to the blog for more inspiration with this cute set!

A Sneak Peek of Some Baby Bear & Sweet Shoppe Cards

I'm popping in to share a quick peek of a some cards that are being featured on the Simon Says Stamp blog today (there are actually a total of three new cards using Baby Bear, Sweet Shoppe and City Streets).  :)


Sunny Studio Stamps: Sweet Shoppe Cupcake Card created for Simon Says Stamp

I hope will stop over to say hi and to see all the cards close-up.  :)