Saturday, September 17, 2016

Guest Designer Spotlight: Autumn Splendor Card by Donna Mikasa


Hello there!  I'm so excited to welcome the talents of Donna Mikasa to the blog today!  I have adored her bright and clean style for a number of years and I'm so tickled that she agreed to be our special guest!

Sunny Studio Stamps: Autumn Splendor Fall Leaves Card by Donna Mikasa.


Card No. 1: The maple leaf was inked with different colors of Distress inks and sprayed with water each time before stamping on watercolor cardstock. 


Sunny Studio Stamps: Autumn Splendor Fall Leaves Card by Donna Mikasa.

Card No.2: The leaves were die-cut from watercolor cardstock and inked with Distress inks and dotted with water from a water brush. They were adhered to a card base with some
foam adhesive for dimension.

You can find more of Donna's beautiful work on her blog, her instagram page or in her flickr gallery.


Sunny Studio Supplies Used:


Friday, September 16, 2016

Halloween Cuties Little Witch Card by Lexa

Hello everyone! Lexa here today sharing a card using the Halloween Cuties stamps and coordinating dies. This is a super fun set with all little elements, one of my favorite is the little witch. The dress is inspired by my little girl's costume on her last school performance, she chose one cute little witch dress.

Sunny Studio Stamps: Halloween Cuties Card by Lexa Levana.

I started with a square piece of white cardstock and clear embossed the spider web before I blended some Chipped Sapphire and Dusty Concorde Distress Inks for the background. I made all the little dots using a white gel pen that looks like tiny stars. I layered the square panel onto a slightly bigger pink square, to match the witch's dress. I stamped all my images using black Versafine and watercolored them with Distress Markers. The bats look even cuter with their googly eyes, Halloween cards are not supposed to be so spooky after all.

I cut a piece of Halloween patterned paper from Doodlebug as the card base, and I think it looks so cute. I was struggling where I should put my "Happy Halloween" then I decided to silver emboss it on a piece of black cardstock.  I'm pretty happy with the result.

Sunny Studio Stamps: Halloween Cuties Card by Lexa Levana.

I hope this gives you some inspiration to start your own Halloween cards. Have a wonderful Friday!

Sunny Studio Supplies Used:
  

Thursday, September 15, 2016

Don't Forget To Enter Our Fishtail Banner Die Challenge!

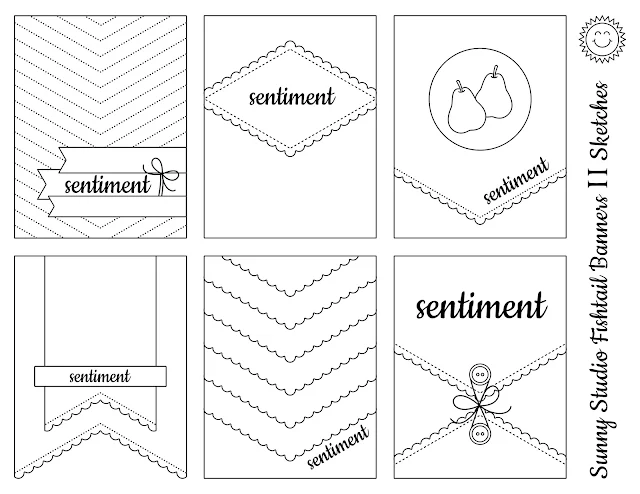
Don't forget there's still a little time left to submit your projects to our challenge HERE using our Fishtail Banner dies for your chance to win a guest designer spot and 2 stamps of your choice from our new Holiday collection coming out on September 30th.  

Sunny Studio Stamps: Fishtail Banner Dies II Sketches

Feel free to use one of these sketches or do something completely different.  I'm dying to see what you dream up!  :)

Halloween Cuties Batty For You Card with Vanessa

Hi everybody!  Vanessa here with a watercolor card using Halloween Cuties. I had some fun creating a watercolor sky and thought the cute bats would look great on it.

Sunny Studio Stamps: Halloween Cuties Batty For You Bat Card by Vanessa Menhorn.

First I applied water to a panel of smooth watercolor paper and added pink, black, blue and turquoise watercolors to it. After it was dried, I stamped the sentiment and adhered the panel to my grey card base. Now I stamped the bats onto white cardstock, colored them with Copics and die-cut the images with the matching dies. Then I adhered the bats, using foam tape for more dimension, and bent their wings slightly up. Finally I added black enamel dots. 

Sunny Studio Stamps: Halloween Cuties Batty For You Bat Card by Vanessa Menhorn.

I hope you liked today's Halloween inspiration! Thank you so much for stopping by!


Sunny Studio Supplies Used:
  

Wednesday, September 14, 2016

Halloween Cuties Hello Pumpkin Card with Lindsey

Hi Lindsey here today sharing a card using the awesome set, Halloween Cuties. I absolutely love Halloween and this set is so much fun to create with. For this card, I just had to use the little pumpkin cat. I just think that image is so precious. So let's get started on how to create this card.

Sunny Studio Stamps: Halloween Cuties Hello Pumpkin Costumed Kitty Card by Lindsey Sams.

I started out with a plaid A2 size card base. Then I cut a purple scalloped oval and a slightly smaller oval out of black cardstock. I stamped some stars and my sentiment on the black oval using a white dye ink. I used the same oval die to cut a partial green oval that I used for the grass. 

I stamped my pumpkin and cat on white cardstock and colored the images using Copic markers. I then cut the images out using the coordinating dies. I popped the cat and pumpkin up on the grass using some foam tape and added a few white highlights with a gel pen. 

Next, I attached the scalloped oval to the plaid card base using more foam tape to add even more dimension. To finish off the card, I added some Wink of Stella to the stars on the black oval and some sequins and stars to the card base. A little sparkle is always fun! That finishes this card.

Sunny Studio Stamps: Halloween Cuties Hello Pumpkin Costumed Kitty Card by Lindsey Sams.

Thanks for reading and I hope you'll check out this fun set! It would be a great set to use to make some Halloween tags for goodie bags. Keep checking back to the blog for more inspiration using this set. Have a great day!

Sunny Studio Supplies Used:
  

Tuesday, September 13, 2016

Halloween Cuties: Batty For You with Anni

Hey stampers, Anni here!  Are you ready for Halloween Cards? Well, I have one for you today. I used the very cute bats from the set Halloween Cuties for this card.

Sunny Studio Stamps: Halloween Cuties Batty For You Card by Anni Lerche.

First I created the rainbow background. I used a piece of water color paper and added some water on it in a shape I wanted for my background. On my craft mat I dropped a tiny bit of Distress Ink reinker in yellow, orange, red, turqoise and green. I dipped a brush into the color and then into the water and then let the water do the work. When I liked how it turned out I dried it with my heat gun. After that I added some splashes of watered down color to the paper.

I stamped, colored the bats with Copics and fussy cut them (there are coordinating dies available). I drew over the eyes with a black gel pen to make them extra black and added some Wink of Stella to the wings.

Sunny Studio Stamps: Halloween Cuties Batty For You Card by Anni Lerche.

I stamped the sentiment directly on the watercolor paper with my MISTI and assembled the card. To finish the card I added some star sequins.

Thanks for stopping by and have a sunny week!
Anni

Sunny Studio Supplies Used:


Monday, September 12, 2016

Halloween Cuties Hello Pumpkin Halloween Card with Eloise

Hello everyone, Eloise here and I'm back here today to feature the new Halloween Cuties stamps and die set. I don't celebrate Halloween, but I love Halloween stamps. They're so fun and I love the colour scheme for Halloween too! So I made a fun scene card today (of course!) and it's inside an oval for something a little different.

Sunny Studio Stamps: Halloween Cuties Hello Pumpkin Card by Eloise Blue

To begin my card today I started off with stamping all my images on some Neenah Solar White Cardstock with some Memento Tuxedo Black ink. I used various colours of Copic Markers to colour in my images today. Once they were coloured, I used the coordinating dies to cut them out. I now moved onto my background. I used Distress Inks for my background, as usual and I picked out a purple, pink and orange for the sky and a green for the grass. I used watercolour paper to ink blend onto since I find I get a better blend. Once all the colours were blended I used a paint brush and some water to do my favourite water splotch effect on the background - I love how this looks with Distress Inks!


Sunny Studio Stamps: Halloween Cuties Hello Pumpkin Card by Eloise Blue

Once that was done I took some green cardstock from my stash and used an oval die to die cut out of it. I wanted the used the oval as a frame. Before assembling the card I white heat embossed the sentiment 'hey pumpkin' onto the background. I assembled my card using a mixture of foam adhesive and liquid adhesive and then for a finishing touch I used my Wink of Stella to add some shimmer.

Thanks for stopping by today and I hope you got inspired to make some Halloween cards!

- Eloise


Sunny Studio Supplies Used: